> ## Documentation Index
> Fetch the complete documentation index at: https://docs-nce.global-e.com/llms.txt
> Use this file to discover all available pages before exploring further.
# Setting the Look and Feel
## Customizing Your Return Portal Look & Feel
The **Look and Feel** settings let you configure the following:
* Layout and margins
* Fonts and colors
* Behavior and display options
* Background elements
This guide describes how to access the Return portal and modify your page’s **background elements**, as shown in the following video:
## Logging in to the Return Portal
To begin modifying your background elements, you must log in to the Return portal.
### To log in to the Return portal:
1. Navigate to the Return Portal login page.
2. Enter your credentials and click **LOG IN**.
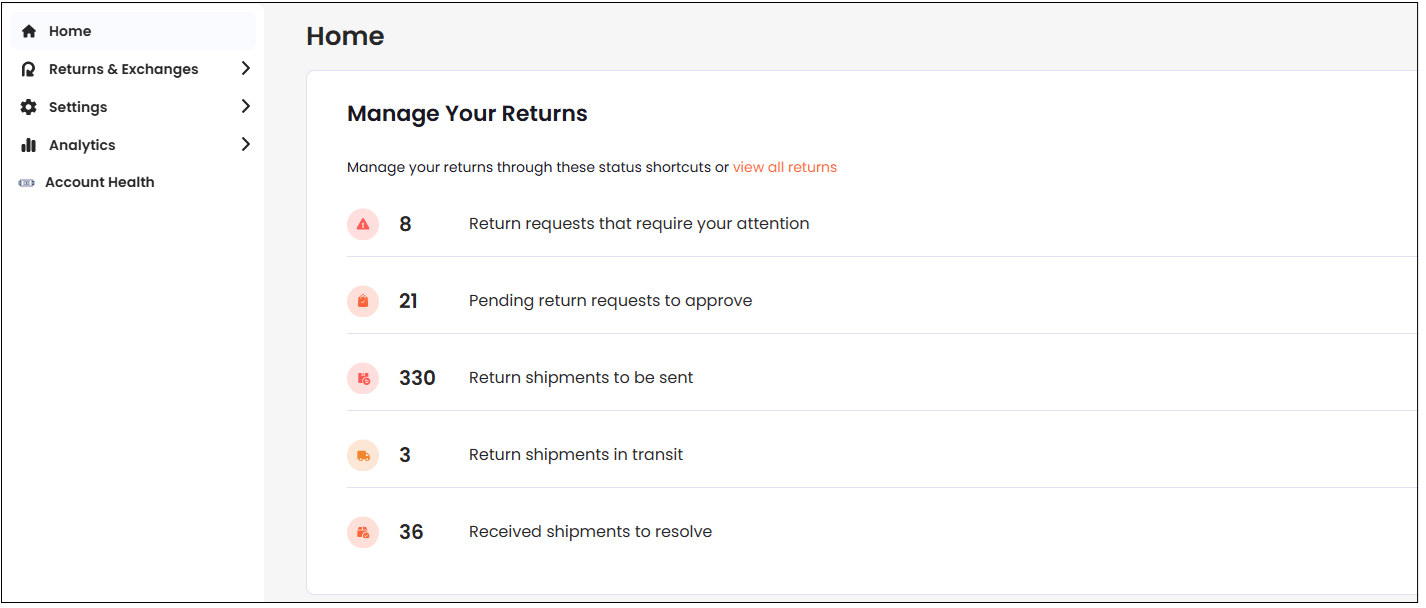
The Home screen is displayed.
 ## Accessing the Background Elements
The **Background** settings let you customize various page background elements, such as color, font, and opacity. You can do this by selecting to use either a color or image as your background and then making all needed customizations.
### To access the Background elements:
1. Navigate to Settings > Portal > Look and Feel.
2. Click **Return Portal**.
3. Click **Backgrounds**.
4. Customize one of the following:
* [Page background](/setting-the-look-and-feel#customizing-your-return-portal-look-&-feel)
* [Portal background](/setting-the-look-and-feel#customizing-your-portal-background)
* [Secondary background](/setting-the-look-and-feel#customize-your-secondary-background)
* [Stroke lines](/setting-the-look-and-feel#customizing-your-stroke-lines)
* [Shadows](/setting-the-look-and-feel#customizing-your-shadows)
* [Cover image](/setting-the-look-and-feel#adding-a-cover-image)
## Customizing your Page Background
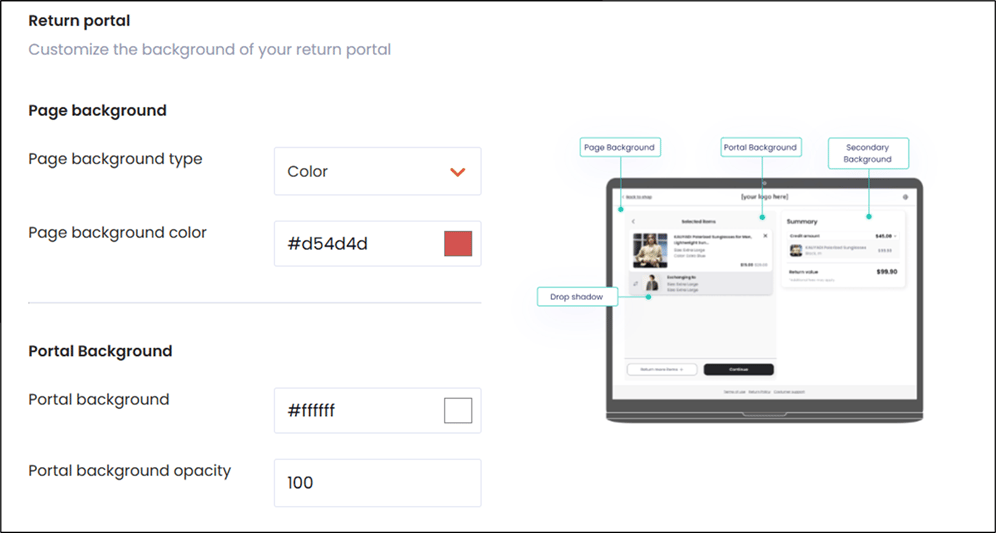
The **Page background** section lets you customize your page background settings, which are applied to each page on your portal. A sample screen is displayed to the right of the customization menus, as shown in the figure below:
## Accessing the Background Elements
The **Background** settings let you customize various page background elements, such as color, font, and opacity. You can do this by selecting to use either a color or image as your background and then making all needed customizations.
### To access the Background elements:
1. Navigate to Settings > Portal > Look and Feel.
2. Click **Return Portal**.
3. Click **Backgrounds**.
4. Customize one of the following:
* [Page background](/setting-the-look-and-feel#customizing-your-return-portal-look-&-feel)
* [Portal background](/setting-the-look-and-feel#customizing-your-portal-background)
* [Secondary background](/setting-the-look-and-feel#customize-your-secondary-background)
* [Stroke lines](/setting-the-look-and-feel#customizing-your-stroke-lines)
* [Shadows](/setting-the-look-and-feel#customizing-your-shadows)
* [Cover image](/setting-the-look-and-feel#adding-a-cover-image)
## Customizing your Page Background
The **Page background** section lets you customize your page background settings, which are applied to each page on your portal. A sample screen is displayed to the right of the customization menus, as shown in the figure below:
 ### To customize your page background
1. Scroll to the **Backgrounds** section.
2. In the **Page backgrounds** region select one of the following:
* Color
* Image
3. If you selected **Color**, do the following:
1. Select **Color** from the Page background type menu.
2. Select a color from the Page background color menu.
4. If you selected **Image**, do the following:
1. Attach an image located on your hard drive from the Page background image field.
2. Set the Page background size.
## Customizing your Portal Background
The **Portal Background** settings customize the primary background color and opacity of your entire portal.
### To customize your portal background
1. Scroll down to the **Portal Background** section.
2. In the **Portal background** menu, set a color.
3. In the **Portal background opacity** menu, set an opacity level.
## Customize your Secondary Background
The **Secondary Background** settings customize the secondary background color and opacity of your entire portal.
### To customize your secondary background
1. Scroll down to the **Secondary Background** section.
2. In the **Secondary background** menu, set a color.
3. In the **Secondary background opacity** menu, set an opacity level.
## Customizing your Stroke Lines
The **Stroke Lines** settings let you customize the stroke line colors.
### To customize your stroke lines
1. Scroll down to the **Stroke Lines** section.
2. In the **Stroke / line color** menu, set a color.
## Customizing your Shadows
The **Shadows** settings customize the shadow settings.
### To customize your shadow settings
1. Scroll down to the **Shadows** section.
2. In the **Popup overlay** section, set a color.
3. In the **Popup overlay opacity** section, set an opacity level.
4. In the **Drop shadow** section, set a shadow color.
5. In the **Drop shadow opacity** section, set a shadow opacity level.
## Adding a Cover Image
The **Cover Image** section lets you add a cover image. This is the image displayed on the main screen of the portal.
### To customize your cover image
1. Scroll down to the **Cover Image** section.
2. Upload an image from your hard drive.
3. The image preview is displayed.
Follow these guidelines for optimal results:
* **Minimum image size**: 500px width and 456px height
* **Maximum file size**: 400KB
* **Supported formats**: .jpg, .png, .WebP
### To customize your page background
1. Scroll to the **Backgrounds** section.
2. In the **Page backgrounds** region select one of the following:
* Color
* Image
3. If you selected **Color**, do the following:
1. Select **Color** from the Page background type menu.
2. Select a color from the Page background color menu.
4. If you selected **Image**, do the following:
1. Attach an image located on your hard drive from the Page background image field.
2. Set the Page background size.
## Customizing your Portal Background
The **Portal Background** settings customize the primary background color and opacity of your entire portal.
### To customize your portal background
1. Scroll down to the **Portal Background** section.
2. In the **Portal background** menu, set a color.
3. In the **Portal background opacity** menu, set an opacity level.
## Customize your Secondary Background
The **Secondary Background** settings customize the secondary background color and opacity of your entire portal.
### To customize your secondary background
1. Scroll down to the **Secondary Background** section.
2. In the **Secondary background** menu, set a color.
3. In the **Secondary background opacity** menu, set an opacity level.
## Customizing your Stroke Lines
The **Stroke Lines** settings let you customize the stroke line colors.
### To customize your stroke lines
1. Scroll down to the **Stroke Lines** section.
2. In the **Stroke / line color** menu, set a color.
## Customizing your Shadows
The **Shadows** settings customize the shadow settings.
### To customize your shadow settings
1. Scroll down to the **Shadows** section.
2. In the **Popup overlay** section, set a color.
3. In the **Popup overlay opacity** section, set an opacity level.
4. In the **Drop shadow** section, set a shadow color.
5. In the **Drop shadow opacity** section, set a shadow opacity level.
## Adding a Cover Image
The **Cover Image** section lets you add a cover image. This is the image displayed on the main screen of the portal.
### To customize your cover image
1. Scroll down to the **Cover Image** section.
2. Upload an image from your hard drive.
3. The image preview is displayed.
Follow these guidelines for optimal results:
* **Minimum image size**: 500px width and 456px height
* **Maximum file size**: 400KB
* **Supported formats**: .jpg, .png, .WebP